
Using Token2 programmable TOTP hardware tokens with PulseSecure Connect
Pulse Connect Secure authorizes the resources that are accessed by users through an extranet session hosted by the appliance.Pulse Connect Secure intermediates the data that flows between external users and the company's internal resources to provide
robust security.In this guide, we will show how to configure multi-factor authentication for logging , using Microsoft Active Directory as the first factor and Token2 programmable tokens (Molto2) as the second factor (TOTP protocol).
The guide is based on the following components:
• Active Directory deployed on Windows Server 2016 ( IP: 192.168.50.10)
• A Token2 programmable token (the guide below shows Molto2 as an example)
• Pulse Connect Secure SPE Virtual Appliance 9.1R12 (build 14139) ( IP :192.168.50.245)
• A microUSB cable and Molto-2 USB Config tool.
The steps below are describing the process using Molto-2 USB Config tool and Molto2 token, but please note that the same operation can be done using any of our programmable tokens and
supported platforms (i.e. Android or Windows) with minor differences.
Configure Pulse Secure Connect
By default, PCS has one Authentication Server, named System Local. In this guide we are going to add two more Authentication Servers:1) “AD” named authentication server, pointed to our local Domain Controller(192.168.50.10).
2) “TOTP” named authentication server, which will serve to connect hardware token.
Adding AD authentication server
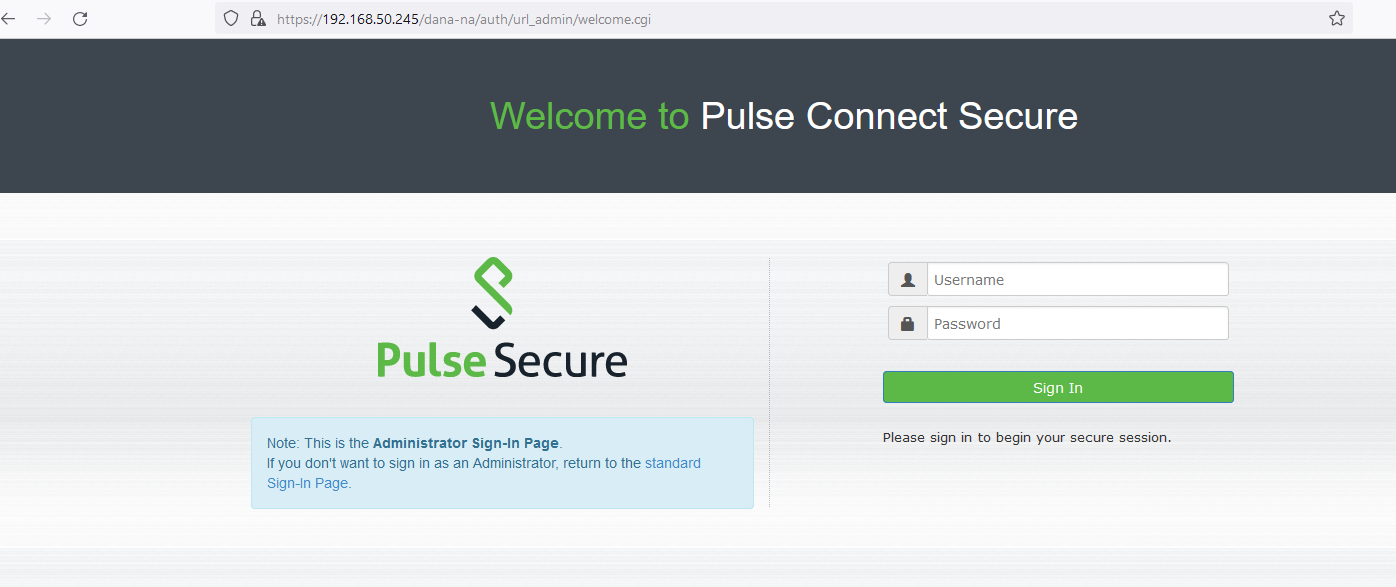
1. Log in to the PCS using admin account:
To avoid any error, please make sure that the primary DNS IP in your PCS Appliance is pointed
to your Domain Controller, and that date/time are synchronized with your DC as well.
2. Go to Authentication/ Auth. Servers :
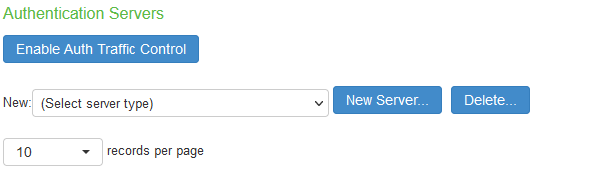
3. Select Active Directory from drop-down list and then click New Server button:
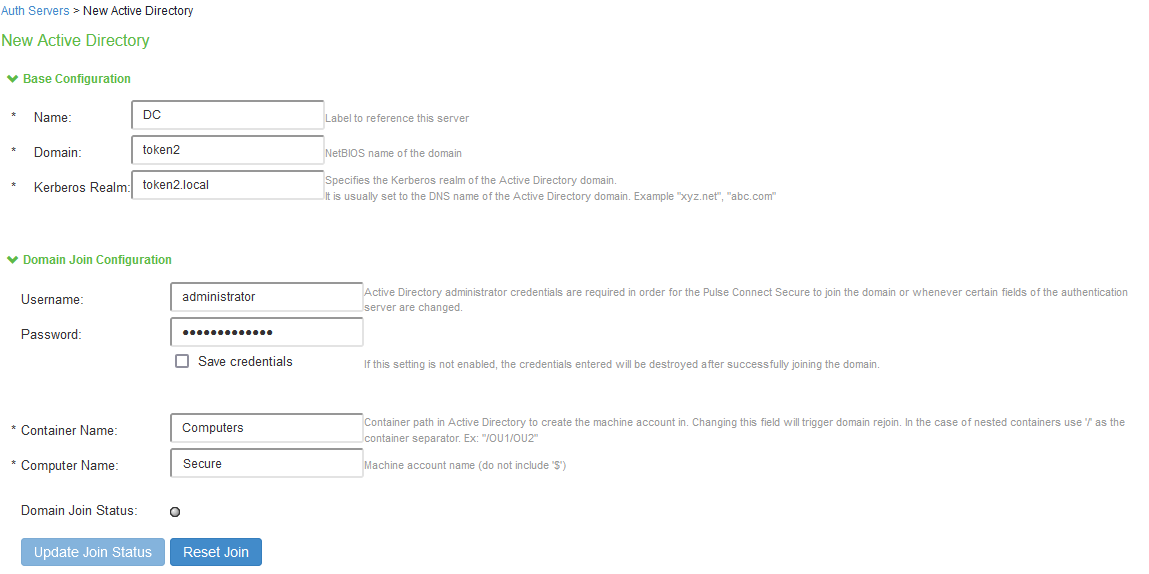
• In the Name textbox type any name .
• In the Domain textbox type Netbios name of your domain.
• In the Kerberos Realm textbox type the DNS name of your Active Directory domain.
• In the Username and Password textboxes type Active Directory administrator credentials.
• In the Container Name enter the name of container in AD , where the machine account will be created.
• In the Computer Name enter any machine account name.
Then navigate to the bottom of active window and click Save Changes. If the provided information is correct ,
Domain Join Status diode goes to green . Click 'Update Join' to get the latest join status.
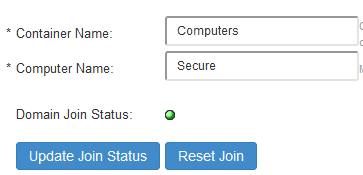
Otherwise, if you are still having issue with joining and Domain Join Status is gray,
Go to Troubleshooting tab and click Basic Verification button:
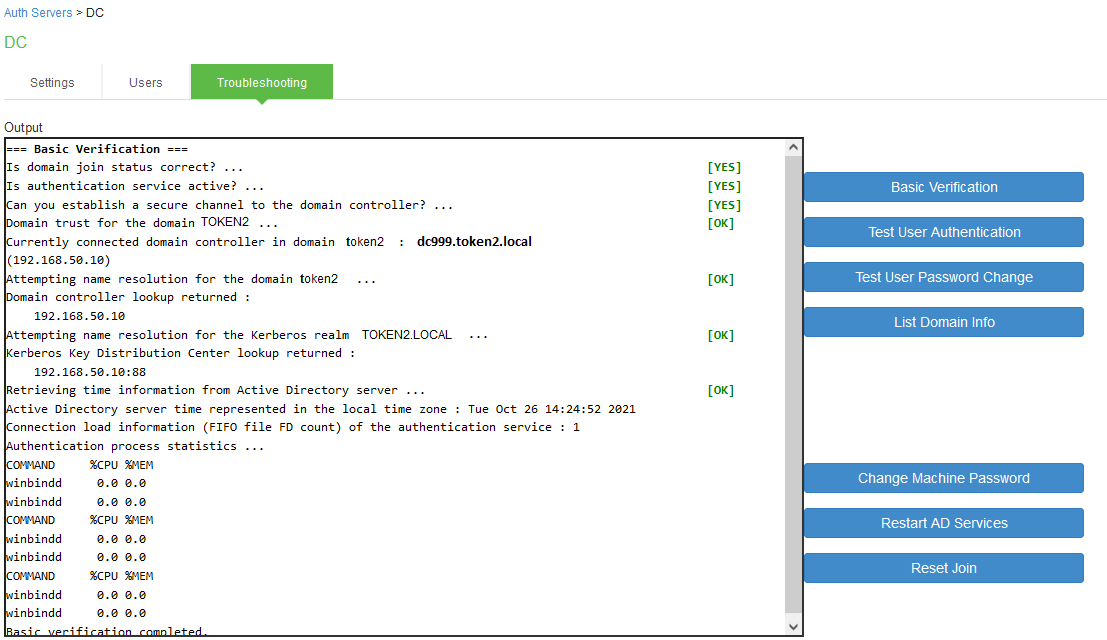
This tool will help you to determinate where you have issue.
Adding TOTP authentication server
1. Go to Authentication/ Auth. Servers .
2. Select Time based One-Time Password (TOTP) Server from drop-down list and then click New Server button:
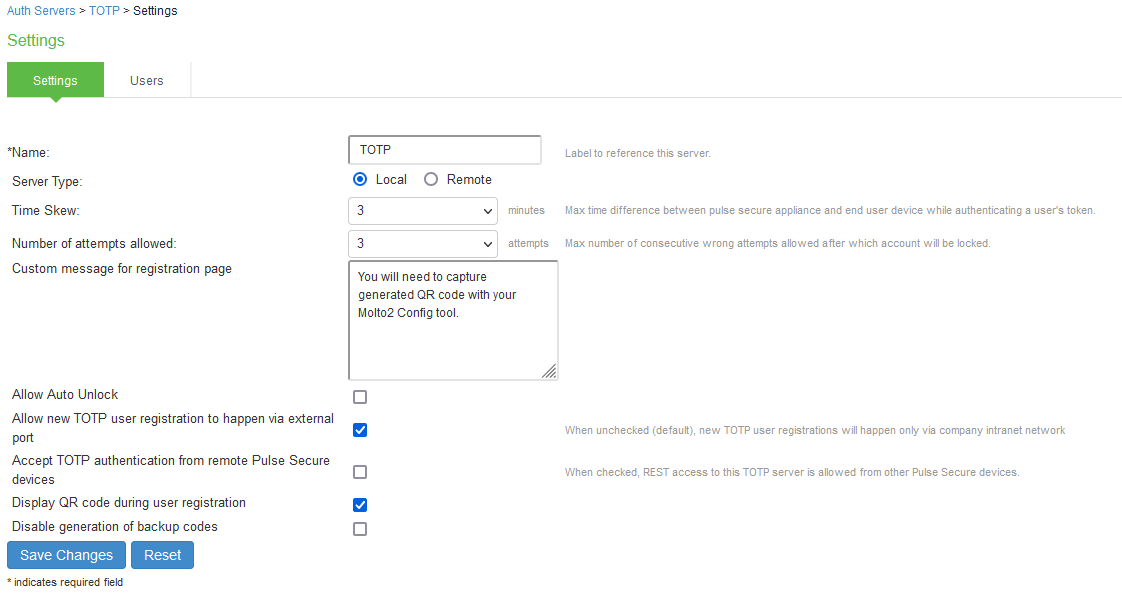
• Name : Specify a name to identify the server within the system.
• Time Skew : Specify maximum time difference between Pulse Connect Secure and end user device while authenticating a user's token. (min: 1 minute max: 5 minutes).
• Number of attempts allowed : Specify maximum number of consecutive wrong attempts allowed after which account will be locked (min: 1 attempt max: 5 attempts).
• Custom message for registration page: Specify a custom message which can be shown on new TOTP user registration web-page.
• Allow Auto Unlock: When checked, locked account will be automatically unlocked after specified period. (Min: 10 Minutes, Max: 90 Days)
• Allow new TOTP user registration to happen via external port: When unchecked (default), new TOTP user registrations will happen only via internal port
As a result of the previous operations, we will have the following Authentication Servers:

Configuring User Realm to Associate DC Authentication Server as Primary Authentication Server and TOTP Authentication Server as Secondary Authentication Server.
1. Select Users > User Realms > New User Realm: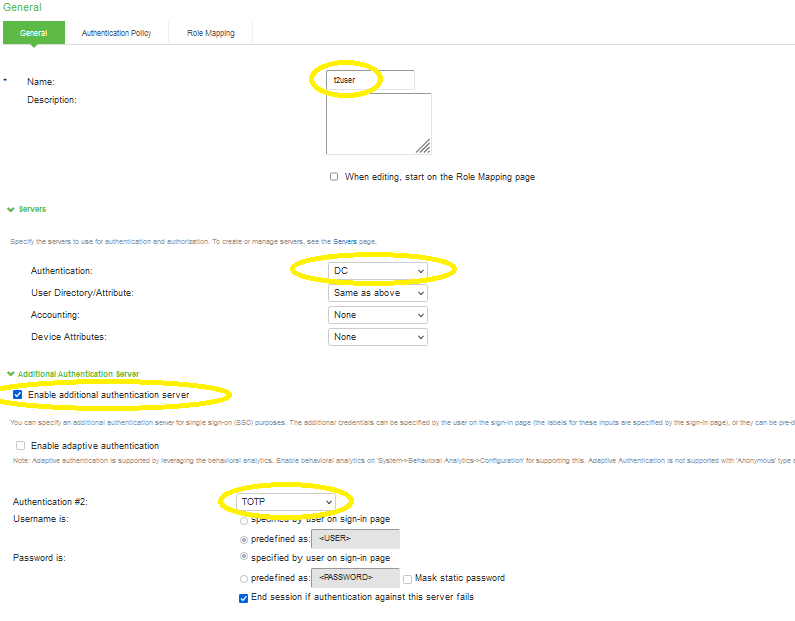
• In the Name textbox type AD user logon name.
• Authentication: Select created ActiveDirectory authentication server name from drop-down list.
• Check option : Enable additional authentication server.
• Authentication #2: TOTP
2. Click Save Changes to apply changes.
Configure provisioning tool
Download & installYou should start by downloading the package and extracting to a folder on your hard drive.
Molto-2 USB Config tool does not need to be installed, it can be launched as a standalone executable file.
Provisioning a TOTP profile
Follow the steps below to perform setting the seed for your token.
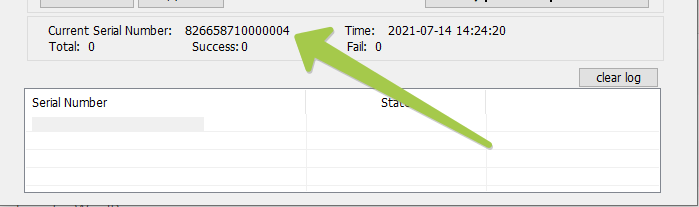
1. Launch the exe file, then select the Molto2 device from the drop-down list and click on "Connect":
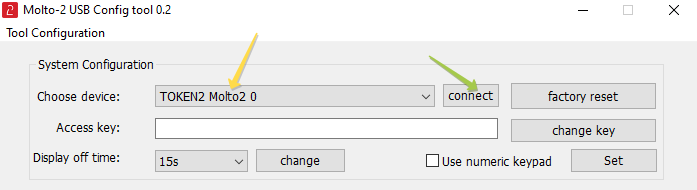
You should see the serial number of the token appearing on the bottom of the window.
2. Select the seed profile from the drop-down list. The first version of Molto-2 has a total of 50 profiles available,
from 0 to 49. With Molto-2 v2, the number of profiles is 100 (0-99).
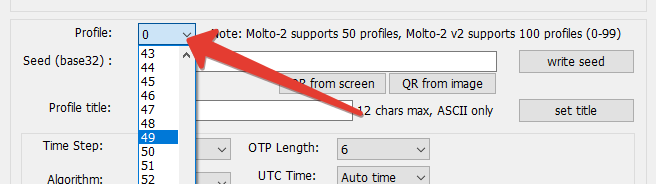
Please note that there is a factory set seed named '0. Token2' under profile №0 - you can request it from us if needed.
3. Fill the "Input seed" field with the TOTP secret hash in base32 format. You can use
the additional buttons under the input field to read QR from the screen (the app will minimize,
take a screenshot and restore again) or load QR code from an image file.
We use QR from the screenbutton to capture QR code from Pulse Secure Self Enrollment page shown below.

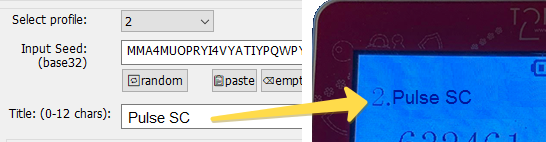
4. Enter a title for the current profile. The title entered should be maximum 12 characters, ASCII symbols only.
It will show on the token display after the profile number (i.e. '2. Pulse SC).
You can leave it empty - then only the profile number will be displayed.
5. [Optional] Configure the TOTP parameters, if needed. In most of the cases, the default settings should be kept.

The description of some features are shown below:
• Time step: the time offset of the OTP generation (OTP regenerates after N seconds).
Choose between 30 seconds and 60 seconds. This should match the TOTP parameters of the authentication system.
• Algorithm: the hashing algorithm of the secret key. Can vary between sha1 and sha256.
This should match the TOTP parameters of the authentication system.
• OTP Length: choose between 4, 6, 8 and 10 digits. This should match the TOTP parameters of the authentication system.
• UTC Time: this allows to sync the system clock of the hardware token.
Keep it as 'System time' to automatically sync with the computer's clock the app is running on.
To manually modify the time, select 'Set time' and enter the time in the format as in this example:
2020/07/25/18/56/33 = (year 4 digits)/(month 2 digits)/(day 2 digits)/(hour 2 digits)/(minutes 2 digits)/(seconds 2 digits)
• Keyboard mode: if set to 'Auto Enter', the device will send the OTP digits together with
'Enter' keystroke (ASCII chr № 13) - this adds the convenience of minimizing user actions needed for
logging on to a system (i.e. a Web login form with 2FA field), as the pressing the Enter key on the keyboard will be emulated,
and the form requesting the OTP will be submitted automatically without the need of clicking the submit button.
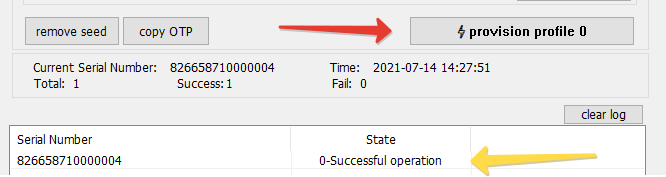
6. Click on "provision profile #" button to complete the process. The log entry should say "N-Successful operation"
Using Molto2 token to register user to TOTP server
Previously we have associated t2user user to a realm that has a secondary authentication server configured as TOTP authentication server.
Now t2user performs a login to the above configured user-realm, navigating to link https://ip_of_PSC/dana-na/auth/url_default/welcome.cgi.
After successful authentication with primary authentication-server(DC), t2user is shown the TOTP registration page:
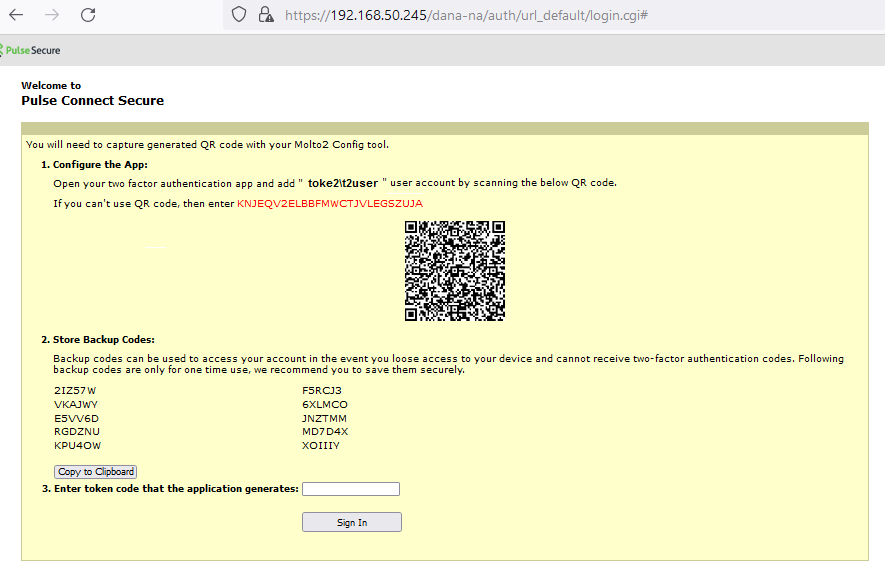
It is time to use this QR code for capturing in Molto-2 USB Config tool. After successfully provisioning operation
with profile # on Molto2 device , we can get appropriate 6 digit OTP code from device’s screen and type it to the textbox above.
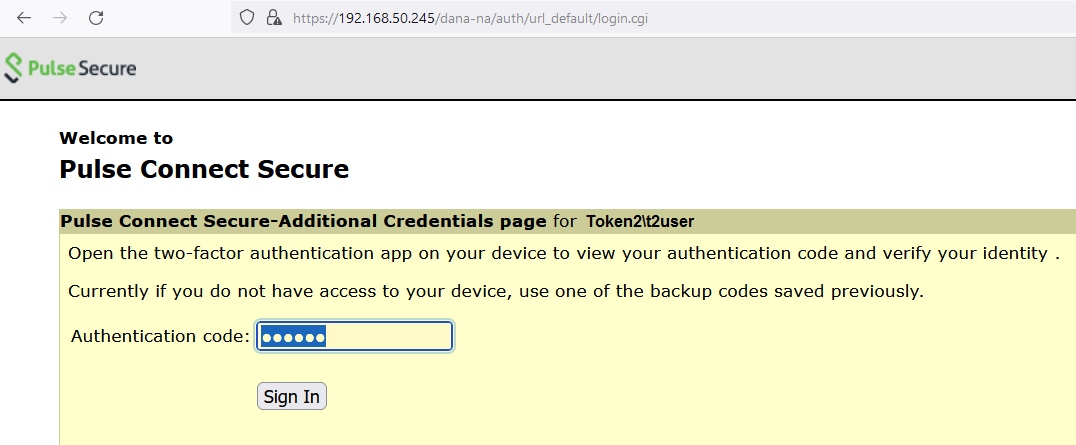
After entering the correct code, the enrollment process ends. On subsequent logins user t2user will be prompted to enter
OTP Code after successful authentication with primary server :
Subscribe to our mailing list
Want to keep up-to-date with the latest Token2 news, projects and events? Join our mailing list!