
Using Token2 hardware tokens with Okta
 Okta is a cloud-based identity and access management (IAM) platform that helps organizations securely manage user authentication and authorization for various applications
and services. It provides tools for Single Sign-On (SSO), Multi-Factor Authentication (MFA), user lifecycle management,and API access control.
Okta is a cloud-based identity and access management (IAM) platform that helps organizations securely manage user authentication and authorization for various applications
and services. It provides tools for Single Sign-On (SSO), Multi-Factor Authentication (MFA), user lifecycle management,and API access control.
You can add Google Authenticator as a multifactor authentication (MFA) option in Okta. When Google Authenticator is enabled as a factor, users who select it to authenticate are prompted to enter a time-based 6-digit code generated by the Google Authenticator app. Token2 programmable hardware tokens can be used as drop-in replacement Google Authenticator, therefore they can be used with Okta exactly the same way. Only provisioning would be different, as described below.
In theory, any programmable tokens would work, however, there is a notice on the Okta knowledge base about the time drift adjustment:
The allowable clock skew is two minutes, meaning that Google Authenticator tolerates the clock in end user devices being ± 2 minutes different from the clock in the appFor this reason, we recommend using Token2 hardware tokens with unrestricted time sync (otherwise you will have to reprovision the tokens every 2-3 years).
Before you can continue with provisioning the tokens, the feature has to be enabled as described below:
Enable Google Authenticator in Admin Console
- In the Admin Console, go to Security > Multifactor.
- In Factor Types, click Google Authenticator.
- Click Inactive in the upper right and then select Activate.
The provisioning process described below is done on behalf of the end user. Here are the requirements:
- An Okta account (free or pro)
- A Token2 programmable token with unrestricted time sync (the guide below shows C302i as an example, but any other can be used the same way)
- An Android device with NFC - this is needed for the enrollment only, subsequent logins will only require the hardware token. Android app is shown only as an example, the procedures are similar with iPhone or Windows versions
Follow the steps below to start the process
- Have the token and your NFC Burner application ready
-
In the web browser on your computer sign in to Okta or an Okta-protected resource, enter your credentials and then click Next.
-
On the Set up multifactor authentication screen, click Setup.
-
Select your device type, and then click Next.
- Perform the QR code scanning steps:
Don’t click Next in the browser yet.
On your mobile device, launch the NFC Burner app.
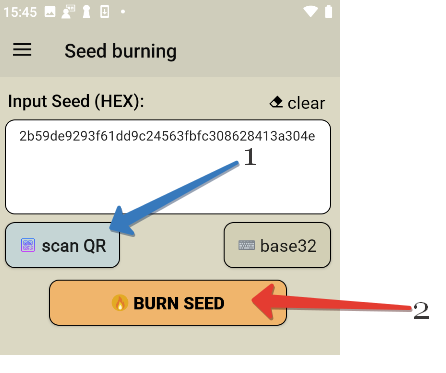
Tap Scan a QR on the burner app and then point your camera at the QR code displayed in the browser on your computer. Your device camera scans the QR code automatically.
Click on "Burn Seed" button
Then, push the button on the token and hold it close to the NFC antenna of your device. Click on "connect" (optional: newer versions of the apps should connect to the token automatically), then "burn seed" button. The app should show "burn seed process succeeded" message if the process is successfully completed.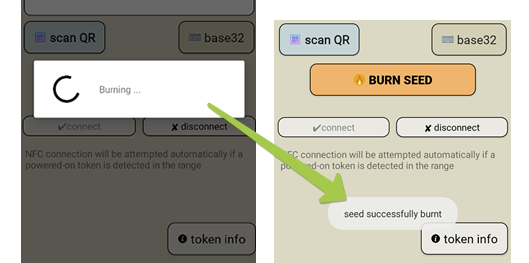
In the web browser on your computer, click Next.
Turn the hardware token off and on, and, in the Enter Code field, enter the OTP value shown on the hardware token device
Click Verify.
Please note that after five unsuccessful authentication attempts, regardless of the time between the attempts, the user account is locked and must be reset by an administrator.
Custom TOTP
Please note that Okta now supports classic TOTP tokens, which they refer to as 'Custom TOTP Tokens.' More information is available here.Subscribe to our mailing list
Want to keep up-to-date with the latest Token2 news, projects and events? Join our mailing list!